突然想给直播间添加一个滚动图片,但在网上搜了一下方法,发现都不算很好弄,特别是对于使用《哔哩哔哩直播姬》的用户来说,基本只能选择制作成视频的办法。。。
总之,感觉有点麻烦,毕竟如果我要换个图还要重新做一个视频什么的,所以我就写了一个简单的HTML页面,打算用网页来滚动图片,再添加几个参数用于设置图片地址、滚动速度、滚动方向什么的就差不多了
这里免费分享,给一些不会弄或者懒得弄的人使用(大佬勿喷,写的很烂,我很菜  )
)
tips:转载请注明出处,谢谢 
说明一下参数以及作用
| 名称 | 类型 | 说明 | 默认 |
|---|---|---|---|
| speed | float | 滚动速度 可选范围0.1到10 (实际没限制,但是不建议超过) | 1 |
| direction | int | 滚动方向 可选范围1~4 1:从上往下 2:从下往上 3:从左往右 4:从右往左 大于4或者小于0默认为1 | 1 |
| imgSrc | string | 图片地址/路径 为空时优先读取写在文件里的图片地址 | null |
注意:imgSrc支持使用网络图片链接,但是加载图片速度取决于你自己的网速,所以推荐本地使用绝对路径
<!DOCTYPE html>
<html lang="en">

<head>
    <meta charset="UTF-8">
    <meta name="viewport" content="width=device-width, initial-scale=1.0">
    <title>滚动图片</title>
    <style>
        body,
        html {
            margin: 0;
            padding: 0;
            overflow: hidden;
            height: 100%;
            width: 100%;
        }

        .background-container {
            position: absolute;
            top: 0;
            left: 0;
            overflow: hidden;
            width: 100%;
            height: 100%;
        }

        .background {
            position: absolute;
            background: no-repeat center center;
            background-size: cover;
        }

        .background.second {
            top: 100%;
            left: 0;
        }
    </style>
</head>

<body>
    <div class="background-container" id="background-container">
        <div class="background" id="background1"></div>
        <div class="background second" id="background2"></div>
    </div>

    <script>

        // 滚动的图片背景地址/路径
        let Rolling_images = '改成你的图片路径';
        /*
        注意!注意!!注意!!!
        如果路径中包含\,则需要转义,也就是在其前面添加一个\
        例如: D:\Downloads\滚动图片\img.png
        填写的时候需要写成:D:\\Downloads\\滚动图片\\img.png
        也可以选择改成:D:/Downloads/滚动图片/img.png
        */

        // 获取URL参数的函数
        function getQueryParam(param) {
            const urlParams = new URLSearchParams(window.location.search);
            return urlParams.get(param);
        }

        // 获取滚动速度参数(默认为1)
        let scrollSpeed = parseFloat(getQueryParam('speed')) || 1;

        // 获取滚动方向参数(默认为从上往下)
        let scrollDirection = parseInt(getQueryParam('direction')) || 1;
        if (scrollDirection < 0 || scrollDirection > 4) {
            scrollDirection = 1;
        }

        // 获取图片地址参数
        let imgSrc = getQueryParam('imgSrc');

        if (!imgSrc) imgSrc = Rolling_images;

        // 创建 Image 对象
        const image = new Image();
        image.src = imgSrc;

        image.onload = function () {

            const imageRatio = image.height / image.width;

            function resizeBackgrounds() {
                const windowWidth = window.innerWidth;
                const windowHeight = window.innerHeight;

                // 计算容器高度,使得背景图片完整显示
                const containerHeight = windowWidth * imageRatio;

                // 如果高度大于窗口高度,则按窗口高度设置
                if (containerHeight >= windowHeight) {
                    document.getElementById('background-container').style.height = `${containerHeight}px`;
                    document.getElementById('background1').style.width = `${windowWidth}px`;
                    document.getElementById('background2').style.width = `${windowWidth}px`;
                    document.getElementById('background1').style.height = `${containerHeight}px`;
                    document.getElementById('background2').style.height = `${containerHeight}px`;
                } else {
                    // 高度不够时,以窗口高度为准,同时调整宽度
                    const containerWidth = windowHeight / imageRatio;
                    document.getElementById('background-container').style.height = `${windowHeight}px`;
                    document.getElementById('background-container').style.width = `${containerWidth}px`;
                    document.getElementById('background1').style.width = `${containerWidth}px`;
                    document.getElementById('background2').style.width = `${containerWidth}px`;
                    document.getElementById('background1').style.height = `${windowHeight}px`;
                    document.getElementById('background2').style.height = `${windowHeight}px`;
                }

                // 设置背景图片
                document.getElementById('background1').style.backgroundImage = `url(${image.src})`;
                document.getElementById('background2').style.backgroundImage = `url(${image.src})`;

                // 根据滚动方向调整初始位置
                if (scrollDirection === 2) {
                    document.getElementById('background1').style.top = '-100%';
                    document.getElementById('background2').style.top = '0';
                } else if (scrollDirection === 3) {
                    document.querySelector('.background.second').style.top = '0';
                    document.querySelector('.background.second').style.left = '100%';
                    document.getElementById('background1').style.left = '0';
                    document.getElementById('background2').style.left = '100%';
                } else if (scrollDirection === 4) {
                    document.querySelector('.background.second').style.top = '0';
                    document.querySelector('.background.second').style.left = '100%';
                    document.getElementById('background1').style.left = '-100%';
                    document.getElementById('background2').style.left = '0';
                }
            }

            // 初始调整背景尺寸
            resizeBackgrounds();

            // 窗口大小调整时更新背景尺寸
            window.addEventListener('resize', resizeBackgrounds);

            // 初始化滚动位置
            let scrollPosition = 0;

            // 滚动函数
            function scrollBackground() {
                scrollPosition += scrollSpeed; // 使用URL参数设定的速度

                const containerHeight = document.getElementById('background-container').offsetHeight;
                const containerWidth = document.getElementById('background-container').offsetWidth;

                // 根据滚动方向更新位置
                if (scrollDirection === 1) { // 从上往下
                    if (scrollPosition >= containerHeight) {
                        scrollPosition = 0;
                    }
                    document.getElementById('background1').style.transform = `translateY(${-scrollPosition}px)`;
                    document.getElementById('background2').style.transform = `translateY(${-scrollPosition}px)`;
                } else if (scrollDirection === 2) { // 从下往上
                    if (scrollPosition >= containerHeight) {
                        scrollPosition = 0;
                    }
                    document.getElementById('background1').style.transform = `translateY(${scrollPosition}px)`;
                    document.getElementById('background2').style.transform = `translateY(${scrollPosition}px)`;
                } else if (scrollDirection === 3) { // 从左往右
                    if (scrollPosition >= containerWidth) {
                        scrollPosition = 0;
                    }
                    document.getElementById('background1').style.transform = `translateX(${-scrollPosition}px)`;
                    document.getElementById('background2').style.transform = `translateX(${-scrollPosition}px)`;
                } else if (scrollDirection === 4) { // 从右往左
                    if (scrollPosition >= containerWidth) {
                        scrollPosition = 0;
                    }
                    document.getElementById('background1').style.transform = `translateX(${scrollPosition}px)`;
                    document.getElementById('background2').style.transform = `translateX(${scrollPosition}px)`;
                }

                requestAnimationFrame(scrollBackground);
            }

            // 开始滚动
            scrollBackground();
        };
    </script>
</body>

</html>
使用方法
首先在你的电脑上找一个位置,例如在创建一个文件夹。

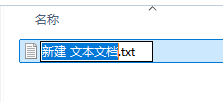
新建一个文本文档,将其后缀名改为html,然后使用“记事本”的方式打开


注意:如果看不到文件后缀名,请将显示文件后缀名选项打开,具体打开方式请自行百度
复制上面的html页面源码,将其粘贴至刚刚创建的html文件中
然后找到大约49行的 let Rolling_images = '改成你的图片路径'; 这一段,将“改成你的图片路径”修改成你要设置滚动图片的文件路径(建议将图片放至和此html同一目录下,这样可以直接使用相对路径)

保存后使用浏览器打开,图片路径没问题的话就可以正常使用了。这时候再调整一下参数什么的就可以复制到你的直播姬/OBS中添加浏览器来使用了

下面说一下如何使用参数(专门给小白讲的,会的请直接看上面的参数说明表格然后使用即可)
首先我们需要知道如何拼接参数;在刚刚打开的浏览器中可以看到一个网址,例如是

可以看到最后面是html,也就是后面没有什么东西了,这时候你添加参数就是“第一个”参数,所以我们需要用 ? 来拼接,然后按这种格式加上参数名=值例如我们要调整滚动速度,就得这样
注意:需要注意?是半角符号,也就是“英语符号”,输入的时候请区分别使用了全角符号的?哦

不管是调整哪个参数,只要是第一个参数,都需要用 ? 来拼接。之后从第二个参数开始则是使用&,例如

调整好自己满意的效果之后,就可以将这个网址复制到你的直播姬/OBS中使用了,这里我就不讲如何添加了


